
Step 2:
Disabling & enabling questions: By default there will always be questions that a customer will be asked in order to give the information necessary to get a quote. These questions are important to check the wording, spelling, and other hints to make sure that your demographic in your service area is able to understand what is being asked. If you see a question being asked that makes no sense (or in the case of a help video- you do not what to use that part) for your clientele, you can simply click the “Disabled” button in the header and there will be no references to that for your customers, or in your pricing area (step 3). You can effectively “clean out questions” by clicking on the disabled button.

Base Price vs Fine Tune Price: Every quote in ResponsiBid has a “base price” area within step 2. These are the questions that will be used to figure out the main components of the bid. You can price the responses to price in terms of dollars (or you can price by time– minutes/hours– and your hourly rate determined in step 1 will convert that to dollars).
Fine tuning questions are questions that are asked in order to tune the bid based on certain circumstances. These questions would help to know if conditions exist that are not the norm, or to break down the complexity of the job. This will become mostly important in step 3 when pricing is done becasue there will be an opportunity to charge (or discount) based on responses to these questions.
HELP VIDEO
This question isn’t really a question asked to the customer… but it is included in the question portion of the module because it will be presented to the customer along with the questions and usually serves as an opportunity to help explain a concept to the customer that will be useful in the “question asking process”. This is not a good time to put in a fully marketing video. In the context of when the customer sees this, they will be trying to come up with specs to the questions being asked. It should be noted that if you upload a custom video to youtube or vimeo this will allow you to position yourself as an expert and convey your brand while you are also explaining the things that they need to know when doing the bidding portion of this module.
YouTube:
Vimeo:
![]()
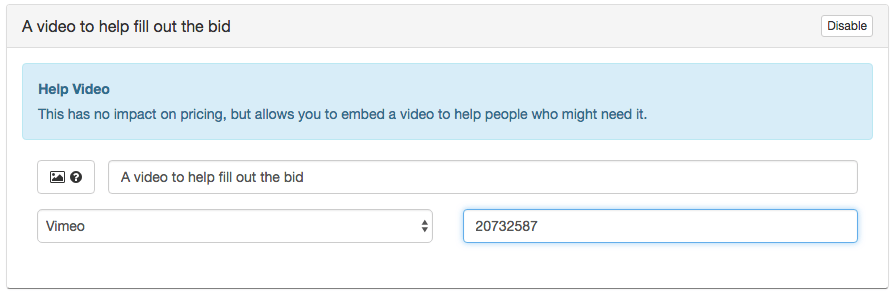
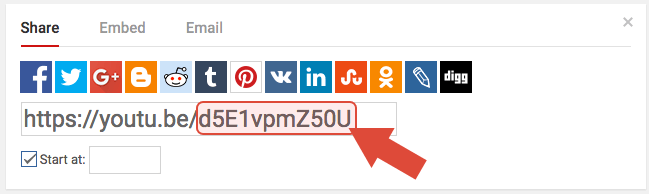
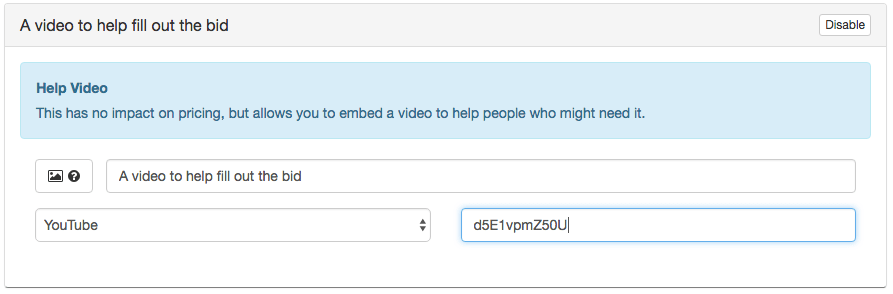
To use this question, make sure it is not disabled. Then you can give the video a title. By default we title the video “A video to help you fill out the bid” To the left of that title input field, you can also provide an image and description that will appear in the header above the video when it is presented. Simply click on the image/description button to the left of the title field and a lightbox will pop up for you to select from imagery and a description field that you can type in as you desire. You can select an image from the library on the left side of the lightbox, and you can deselect it by clicking again. Once you have everything the way you like it you can save and close the lightbox. The you must select the service that you are hosting your video on (youtube or vimeo at this time) and then paste in the “Video ID” (see image above to see how to get that). By doing this, the area is ready to use. It saves itself as you go, so the moment you are done, there is no need to save. It’s ready to go.
HOW MANY
This question allows you to create as many questions as you need to collect the quantity specifications about a job. This is where items are identified and counted. There are 2 main components to this area:
- A title and heading bar
- The actual items being counted

Title input: In the title area you will be explaining to the customer what kinds of items are going to be counted, make some general instructions (succinct is good), and possibly choose an image for the header as you see fit. This header will set the tone for how to proceed through the counting process.
![]()
Adding items (or conditions): The items below the title/description/image line is the area where you can add each of the items you would like to be counted. You can add items by clicking on the green button that says “Add Condition”. Keep in mind that you can only “hide items” not delete them. This is so that if any bids exist with that condition, you cannot ruin that bid by deleting the condition. Also, you can bring back any condition you want at a later time by clicking the “Show Deleted Options” button (once you have actually deleted an option).
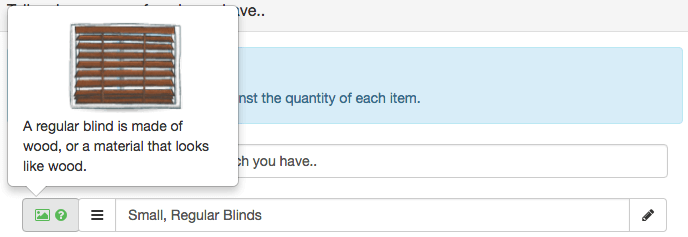
Item descriptions & images: When the conditions are presented to the person giving the estimate, each of these items will be available in a “panel” for the bidder to look at. You can choose an image to present in the panel along with a specific description by clicking on the image/description button to the left of any condition line item and launching the lightbox. In that area you can select an image by clicking on it, or de-select the image by clicking on it again. If you want an image that is not there, feel free to send an image that you would like us to add to the chat bubble in the lower right-hand corner of the screen. You can also add your own description with your own terminology in the text box to the right side of the lightbox. Once you are satisfied, click the save button to close the lightbox.
Editing or deleting an item: If you’d like to edit the text of any line item, simply click the pencil icon to the right of the text. This will allow you to give permission to change the text of an item and make it say something different. It is kind of annoying to have to go through the edit-enabling process, becasue you have to authorize each one, but this is becasue so much damage can be done to your past bids by changing the meaning of any line item. We recommend that you create new line items (conditions) before changing existing ones if you are going to create something that doesn’t already exist (as opposed to just refining the naming of something but not changing the overarching meaning). If you’d like to delete an item, you will first need to click on the pencil and go into edit mode to gain access to the “x” that will allow you to confirm your decision and delete an item. You can remain editing for 20 seconds after your last action within any input field.
reordering your items: If you’d like to reorder your panels for the customer, simply grab the “hamburger” icon the is directly before the input field text and drag it into the order you’d like.