If you’d like customers or yourself to have the option to enter in the exact square footage of building sizes, you can turn that feature on, but there are several places you’ll need to go to get it fully working:

1. You’ll need to first enable the functionality in your form builder

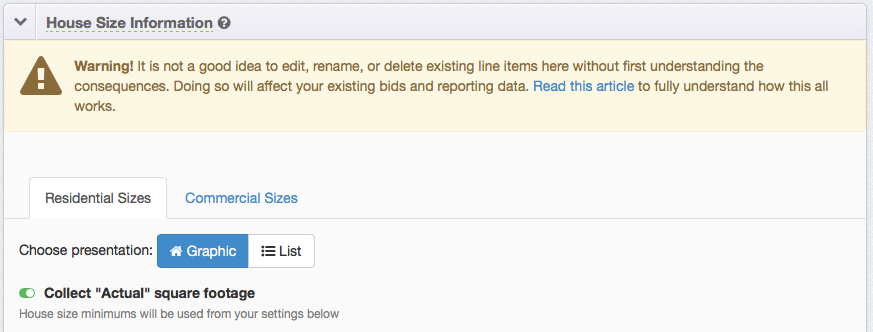
You can enable the ability to use this feature by going to “Settings > Form Builder > House Size Information”. Simply toggle the “Collect ‘Actual’ square footage” switch to be green. Be sure to click save!

Click to learn more about how to properly enable this feature

screen-shot-2016-10-21-at-9-15-32-am

When you do this, you will find that you now have several other options at your disposal in 3 places: Each service editor that uses square footage (both commercial and residential), the smartform/lightbox, and the customer profile. So now you’ll need to go and do a few more things.

Before you go anywhere else (if you’re using graphic house sizes), make sure that the house size increments of square footage (ResponsiBid based them on your menu prices) match up with what you would expect them to be. This will be very important to making sure that you have everything all setup the way you want to to work. Now that you have turned this feature on, ResponsiBid will need to correlate actual square footage intervals with your graphic sizes.

Click save, and let’s go on to where you get ResponsiBid to actually start using this feature within certain modules…

2. You’ll need to turn it on for the services you’d like to use this feature

Once the feature is enabled, you’ll need to turn it on for each module that you’d like to enable “per square foot pricing” for… in addition to actually setting up the “per square foot pricing” for each of the packages within those modules. Any modules you do not turn this on for will continue to run as they did previously simply using the size ranges.

Click to learn more about how to properly turn this feature on for a module

Go to “Settings > Services” and select a service that uses the building size our ladderwork as a factor for determining pricing. In our example we will go into “Rough Gutter Cleaning” and make the changes there. The you can proceed to step 3 to get to your pricing area for that module. Once you get there, you will see the building size matrixes… but they’ll look a little different than before:

actualsquareft

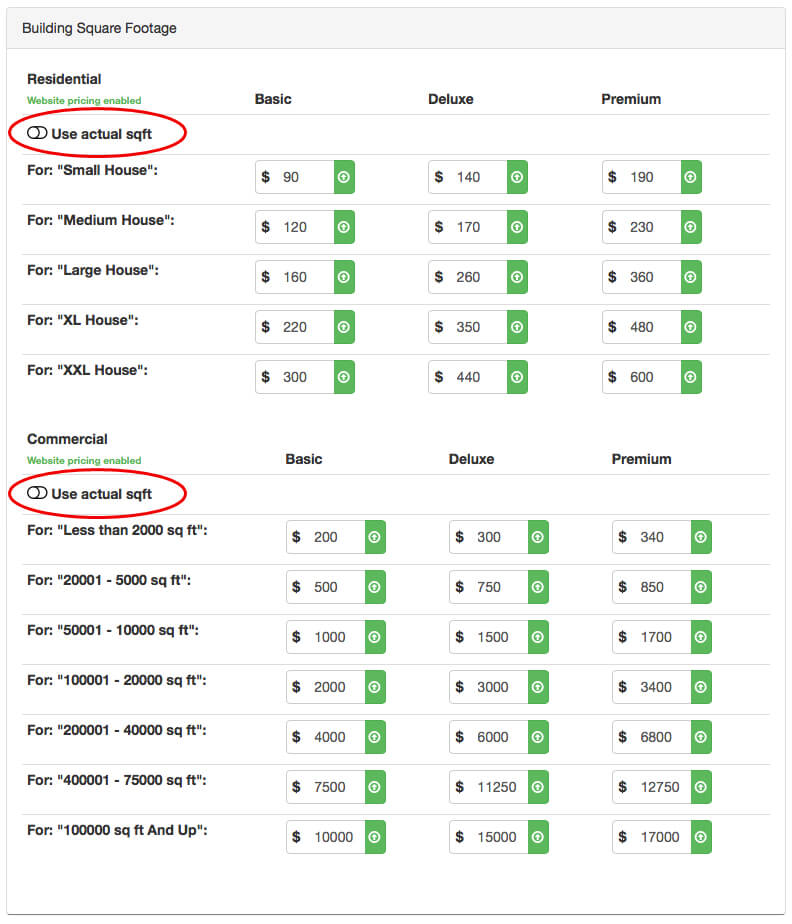
You’ll see that in this example, the company is allowing ResponsiBid to give quotes for commercial AND Residential quotes, so the pricing for the intervals is exactly as it was before, but now there are 2 new switches… You can now turn on the option to price the service based on the actual number of square feet. So you can toggle those switches on and get some new inputs. By default, the prices will come in as $0/sf but you can now enter in the price you’d like each package to be:

actualsquareft2

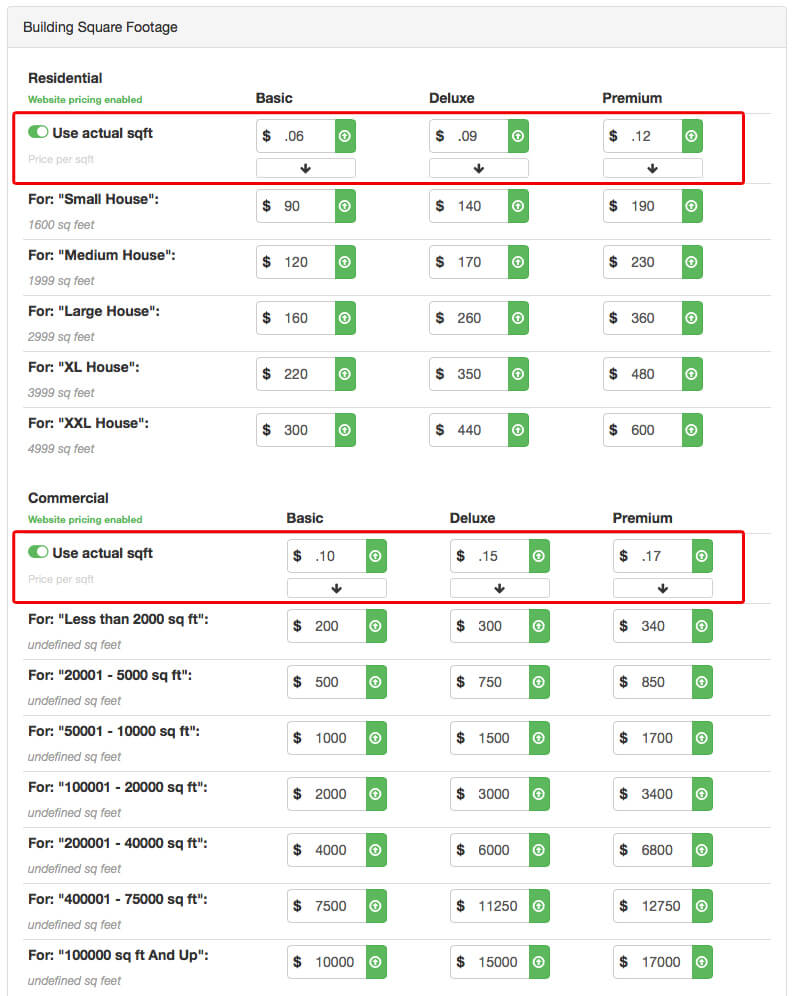
You can see here that we have entered in 3 values for residential properties, and 3 different values for commercial properties. So now if a residential customer indicates that their home is 2500sqft, ResponsiBid will multiply that square footage with $.06 for this factor for the basic package and then $.09 and $.12 for the deluxe and premium packages respectively. However, if a commercial building the same size put in a quote, the values $.10, $.15, and $.17 would all be used for the correlating packages. This way your price can be as perfectly narrowed down to the actual size of the building and whether it is commercial or residential pricing.

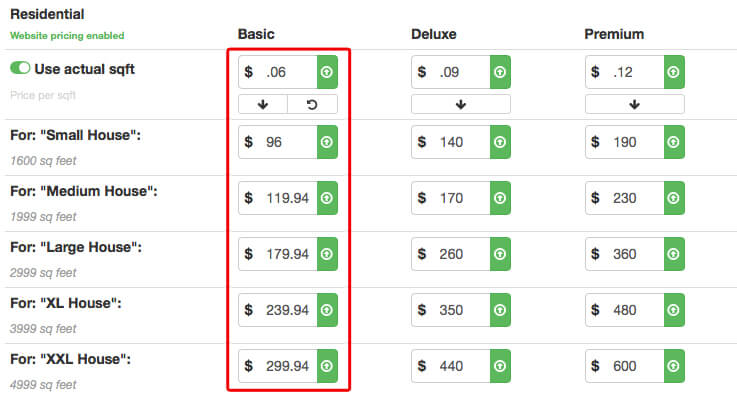
You’ll also notice the “down arrow” below the square footage options. This is so that if you desire to bring your “range options” into line with your “actual square footage pricing” you can click that button to multiply that price by the upper limit of each range’s square footage. see an example below:

actualsquareft3

In this example you can see that when the down arrow was clicked, $.06 was multiplied by the upper limit of each size down the entire column. This resulted in actually changing the pricing in real-time very quickly. If the change was undesirable, there is an undo button that will allow you to go back to what was there before the change. However, once you start manually changing data below, or refresh the page or make any other changes to that string of data, the ability to undo as expected could either go away, or not produce reliable results.

The similar ability applies for access charges, with one caveat: You will need to go into each package’s tab to enter the per sqft price for each tab for it to work as you’d expect.

It is important that you understand the next part where the bid is created to understand why leaving the interval pricing active is still necessary. But for now, just understand that any bids using non-actual house sizes will still be supported by leaving this feature active and NOT disabling building size intervals altogether.

3. Understand how the bidding process will now work with this feature turned on

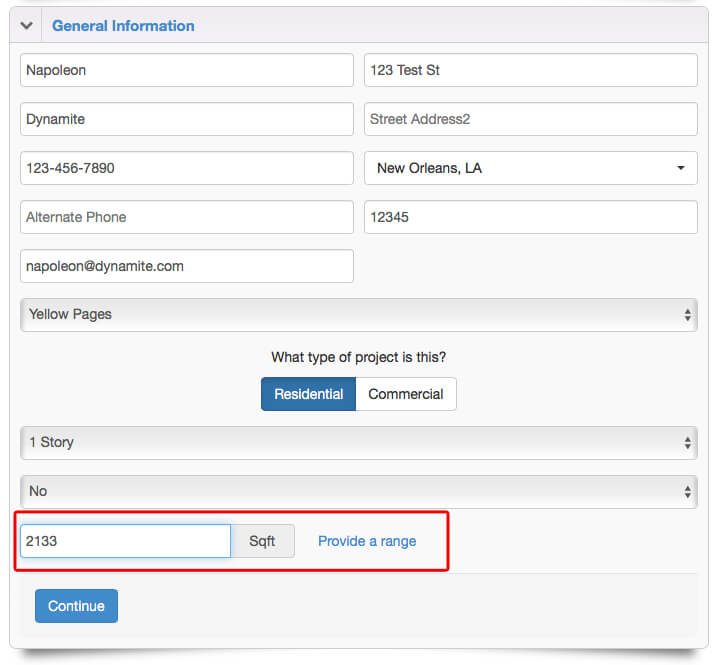
Once the feature is enabled, every customer will be asked for their building’s exact square footage. If they don’t know it, there will be an option to just give a range. This will revert back to the way bids would have been given previously using the menu or graphic house size options as you have setup in your form builder. Of course commercial bids will always use the menu option.

Click to see the workflow

When the customer is asked for their house size, notice the new input:

actualsquareft4

In this input they can enter in their exact square footage or just chicken out and provide a range to revert back to the range option that you have setup. They will continue on through the process as expected.

You might be wondering what ResponsiBid is going to do with the information based on however many modules you have currently setup. Well, the first thing ResponsiBid will do is determine which interval the exact square footage falls into. If you are using a module that doesn’t take advantage of exact square footages, ResponsiBid will just use the range that it determined this square footage falls into. If the module does use this feature, then the actual square footage will be multiplied by the appropriate “per sqft amounts” per package.

Pretty smart, eh?!

4. Learn how it works in the customer profile

Inside the customer profile you can use this new feature within the customer’s general information area, and also to see how the price was calculated.

Click to see how it works in the customer profile

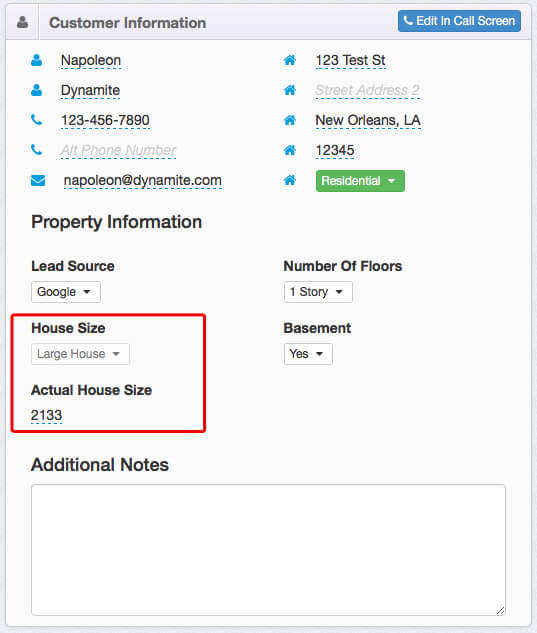
Once a bid comes in that has indicated an actual square footage for building size, you will notice that the customer profile will indicate that right inside the general information area:

actualsquareft5

Here you will see that ResponsiBid greyed out the “house size dropdown” in favor of the actual square footage. Any time that the square footage is known, ResponsiBid will automatically use the correlating house size interval for the modules that are using that, and the exact house size for the modules using that feature. If you click on the square footage number (with the dashed blue line under it) you can edit the actual house size value. If you make it empty, the dropdown will become usable again from the user interface to rely just on the house size interval.

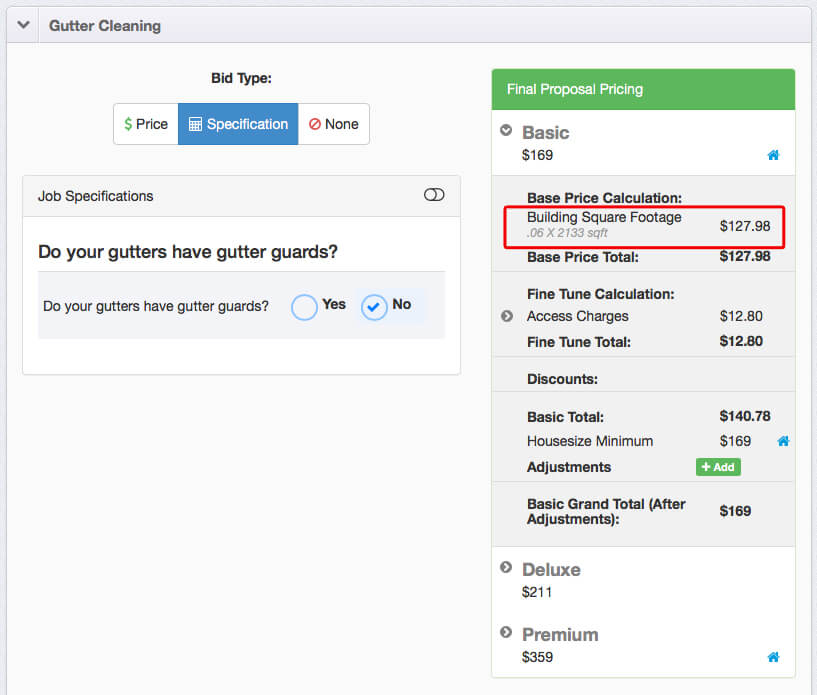
If you look down into the actual bid areas below, you can see how the square footage is used inside of the calculation of the quote. Simply open up the factor that would normally show the house size factor’s contribution to the overall price and you’ll see that instead of a static number there is now going to be a calculation of the actual square footage multiplied by the per sqft price:

actualsquareft6

Conclusion

And there you have it! That’s all of the information on how to fully use the “Actual Square Footage” feature. It can help you make certain modules way more exact than you ever thought possible. It may not be right for every module, but it is definitely something that will make certain modules as specific as you need!