
As of 11/20/17 you will notice that you will no longer be locked out of jobs that you schedule into Jobber. The lockout was a really great way to make sure that when a job was scheduled that it didn’t get unexpected behavior as changes were made in one place and had unexpected changes where it might not update the other side of the equation.
We have improved it so that you can make changes on both sides and it will change the other side. Here are some examples of what will now work:
- You can now see/edit a bid in ResponsiBid after you have sent it over to Jobber!
- When you update a bid in ResponsiBid with specs or price overrides it will now update the line items of the job that is scheduled in Jobber.
- When you change the price of a line item in Jobber that originated in ResponsiBid it will now update that price in ResponsiBid.
- You can add a new service to a job by reconfiguring the bid in ResponsiBid and that line item will be added to the work order in Jobber.
- If you remove a service from an already scheduled job in ResponsiBid by reconfiguring it… it will remove it from Jobber.
- Likewise, if you remove a line item in a Jobber work order that came from ResponsiBid it will remove it from the Job in ResponsiBid.
Things that will not work:
- If you add a line item in a Jobber work order, ResponsiBid will ignore that as it won’t know where to put it in ResponsiBid. ResponsiBid will only sync with line items that originated in ResponsiBid.
- If you change the title or description of a line item in a Jobber work order that came from ResponsiBid, not only will ResponsiBid not do anything with that (as it would have to globally change the name of your service or package), but your changes will be returned later on in the syncing process to what ResponsiBid originally called that line.
- There is currently a known issue in Jobber that if you edit the work order in the quick edit screen from the calendar that it will not send that information back to ResponsiBid (as of now). In order to get the right syncing of that you will need to go into the work order’s “full edit mode” by clicking on the “actions button” and then edit the entire work order. When you save from that screen, then Jobber will send the update. They hope to have that fixed soon, but in the meantime if you edit it fully you should get the nice effect.
Understanding the Jobber + ResponsiBid Connection
Jobber is an operational software and ResponsiBid is a sales software. As such, there is a big difference in the way that ResponsiBid builds quotes. If you added up every service package in a ResponsiBid quote, it wouldn’t make sense. for example if you offered a Basic, deluxe, and Premium package within a service the customer is going to pick one, not all of them. So to make a Jobber estimate would be confusing and difficult to work with. Imagine now if you have 3 packages within each of multiple services that were quoted… it would get out of hand pretty quick.
As a result, you’ll see that ResponsiBid will hold all quotes and only pass on the prospects person information to Jobber until the job is actually booked. Then all the magic starts to happen. But first…
Turning on the connection
Once you are ready to turn on the connection you will simply go to Settings > Connections and open up the Jobber connection. Once you click “Enable Connection” you will be taken to an authorization page within your Jobber account. If you click “Allow” this will give Jobber the permission needed to turn the connection on.
By doing this, you will be prepared to start sending quotes over, but at this point no data has actually started moving between ResponsiBid and Jobber yet.
Once you have set up all of these settings, ResponsiBid is ready to start working with Jobber.
The workflow of using ResponsiBid with Jobber
Once you have made the connection of ResponsiBid with Jobber, you will be able to have some really neat integrations in place to help you work through the process of winning a job and using the tools at your disposal. Here’s all the things you need to know.
Answering the phone, where do you go? The Call Screen.
The first thing you’ll notice is that if you take a phone call, you won’t yet know if the person calling is a past customer, a new prospect asking for a bid, or someone who needs you to come out and give a quote in person… So here’s what you can do to get all the information at your fingertips as quickly as possible.
When you start typing in personal information, ResponsiBid will not only search your ResponsiBid contacts, but it will search your Jobber contacts too. As you see the search happening in real time on the right hand sidebar, you will notice that a name can have any combination of 3 clickable icons below the general information.
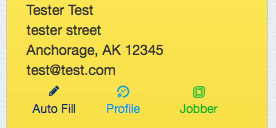
- Autofill – This is how you can pull that person’s information into ResponsiBid to begin a new quote (if there is no ResponsiBid profile icon yet) or edit a current quote (if there is already a ResponsiBid profile icon too.) By clicking this icon, the call screen will populate with all of the information we have access to to begin or add to a quote.
- ResponsiBid Profile – If this icon is present, that means that the contact is already in your ResponsiBid account and has an associated profile. By clicking this icon, you will leave the call screen and go to that customer’s profile inside of ResponsiBid.
- Jobber Client – If this icon is present, it means that Jobber has this client. By clicking this icon, you will be taken to a new tab or window inside of Jobber to be able to see job history and any other information you have about this client within the Jobber software.
If all 3 icons are showing for a specific contact:
This means that you have this client in both places AND the contacts are linked. If you make a change of any sort regarding their name or email address, or billing address in one place, it will change it in both places.
If only the ResponsiBid Profile shows for a contact:
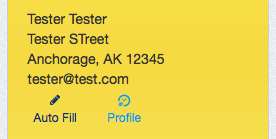
This means that this contact is not currently connected to a Jobber client. That doesn’t mean that they don’t have a congruent person in Jobber yet… it just means that there hasn’t been a connection made. The moment you save, re-run a bid or anything for this client, ResponsiBid will take that opportunity to try to find that person in Jobber and then either merge or create a new client in Jobber for your convenience.
If only the Jobber Profile shows for a contact:
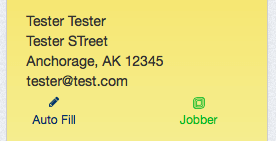
This means that the contact is only in Jobber, and while you can click the autofill button to create a new bid in ResponsiBid for that contact (which will then also link it directly to the Jobber client you autofilled from), there is no record of that person inside of ResponsiBid.
But what if I see this:
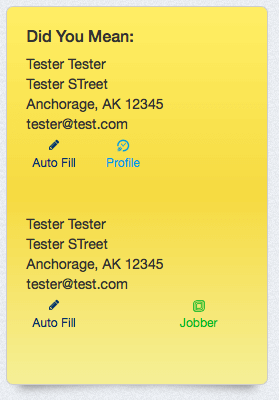
You can see that this is OBVIOUSLY the same person… Note that the person even has the same “STreet” oddity in the address area. This indicates that more than likely this is an import where the data is going to match perfectly. So why are they separate? The reason is that you can clearly see that they do exist in both places, and just haven’t been merged yet. If you save the top version of that client within ResponsiBid, you would probably note at that point that they show up as a single contact from that point forward with all 3 icons. Also, if you used the “Send all contacts to Jobber” button in the connections area you would not see much (if any) of this since they would merge together. So in this case, it’s a matter of just getting the clients to merge and create the bond from within ResponsiBid so that they don’t have to show up separately like this.
I have a bid. Now I want to make a Job in Jobber.
When you made the connection, you immediately created a special status called “Job in Jobber”. When you’re ready to schedule the job, simply determine when you would like to schedule the job, then go into ResponsiBid and change the status to “Job in Jobber”.
When this happens you will be given the following options:
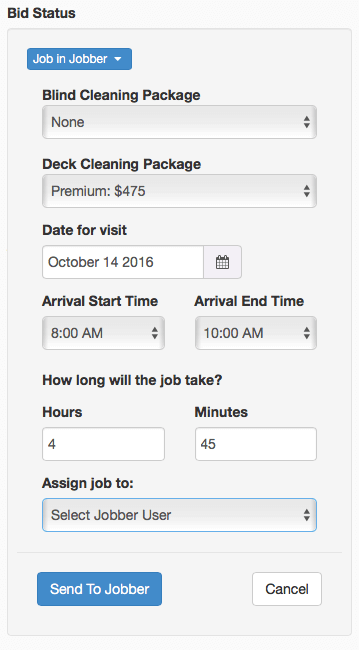
You must select at least one package offering for a job. Then you may select a date in the future for the job to be performed. The job start time is the “Arrival start time”, but the “Arrival End Time” is the end of the arrival for which your customer would expect you to arrive. You can choose a default time to add to the window under settings > administrator > calendar settings. Based on the default hourly rate you entered into the connection setup, ResponsiBid will take a guess at the amount of time the job will take, but you can edit it as you need to. Lastly, you must choose a Jobber user to do the job (probably the job lead). If there will be multiple technicians on the job site, you will need to click into Jobber and add the additional techs to the visit.
Once you enter in all of the required information, ResponsiBid will create a job for that client in Jobber and the work order will be created and a visit will be created for the lead tech. You can customize the times and anything else you need.
I have a Job in Jobber now what?
You will now have a job in ResponsiBid that is connected to the job in Jobber and they can now sync.
- You can now see & edit a bid in ResponsiBid after you have sent it over to Jobber. Any line items that originated in ResponsiBid will sync back and forth.
- When you update a bid in ResponsiBid with specs or price overrides it will now update the line items of the job that is scheduled in Jobber.
- When you change the price of a line item in Jobber that originated in ResponsiBid it will now update that price in ResponsiBid.
- You can add a new service to a job by reconfiguring the bid in ResponsiBid and that line item will be added to the work order in Jobber.
- If you remove a service from an already scheduled job in ResponsiBid by reconfiguring it… it will remove it from Jobber.
- Likewise, if you remove a line item in a Jobber work order that came from ResponsiBid it will remove it from the Job in ResponsiBid.
Navigating back and forth between Jobber and ResponsiBid
Sometimes you’ll be in a customer profile within ResponsiBid and you’ll want to do some editing, or maybe visa versa. It’s really easy to do:
In the ResponsiBid Customer profile: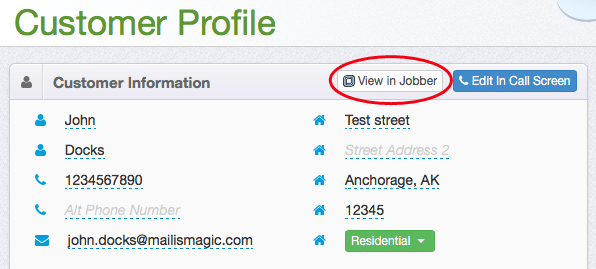
Once the bid has been linked to a Jobber client (via a save or doing the auto import in the connections area), you can simply click the button from within the customer profile in order to quickly jump over to the Jobber client. If there hasn’t been a link created between a ResponsiBid client and a Jobber client yet, this button will simply allow you to “add it to Jobber” and then a link will be created.
In the ResponsiBid Call Screen: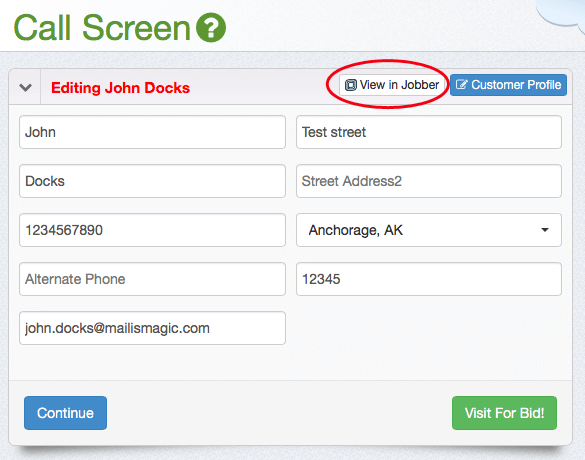
From the call screen you can either search for a contact as listed above in the call screen area, or as in the case shown above where you are editing a customer in the call screen, you can click the button in the top bar to quickly take you over to Jobber where you can visit the client’s history of items there.
In the Jobber Client (once it has been linked):

When you are visiting a client in Jobber who has been linked to ResponsiBid you’ll notice there is a custom field called “ResponsiBid Profile”. This is a clickable link that will quickly take you back to the customer’s profile inside of ResponsiBid.
In the Jobber Job (whenever created from ResponsiBid):
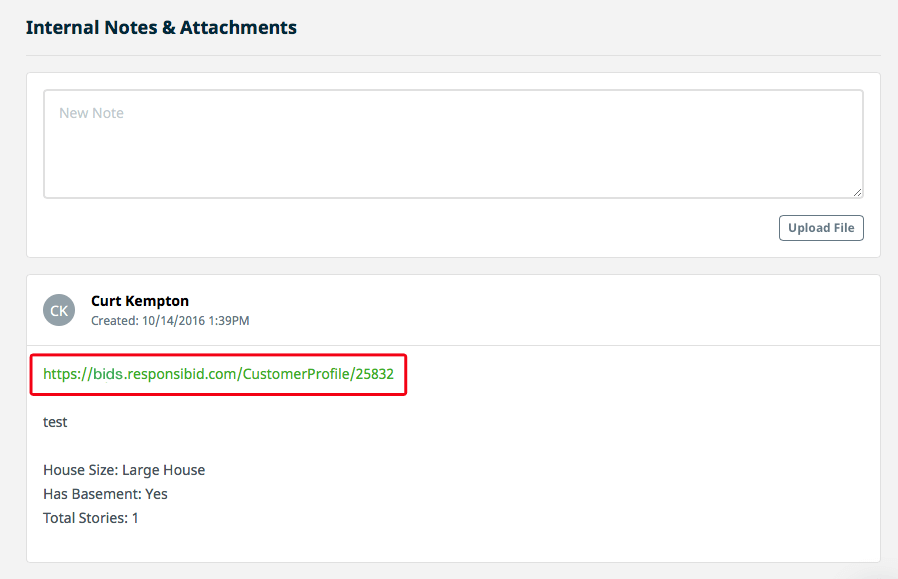
Any job created in Jobber from within ResponsiBid will automatically add a note to the very bottom of the job. You can click that link to go directly back to ResponsiBid as well.
Follow-up with ResponsiBid or Jobber for your jobs
If you decide to use the Jobber follow-up, the first thing you’ll want to do is make sure that in the connections are of ResponsiBid you uncheck the box to do your “Job in Jobber” follow-up in ResponsiBid. Whichever place you decide to do your follow-up is important that you turn the other side off.
Conclusion
We hope that you love this connection and it makes your life much easier. Please let us know if you encounter any issues through our in-app chat feature.